Entities basics - Drupal 8
An Entities type is a type which represents many items in drupal8 which includes items as follows :
(a) Nodes (content)
(b) Files
(c)Taxonomy (vocabularies)
(d)Taxonomy terms
(e) Users
(f) Comment
During the development of your application you will need to perform some action on these entities.
An Entity term is used as abstraction to group fields together.
Finding Existing Entities
we will expand the module functionality by adding a new form that will be searched for a node given a title entered by the user, it will also display elements of that node in a window.
In our src\form directory we will create a new file named as ” HelloModalForm.php“.

add the following code in this file.
<?php

	//include helloform
	namespace Drupal\hello\Form;

	//include formbase class
	use Drupal\Core\Form\FormBase;

	//include formstateinterface
	use Drupal\Core\Form\FormStateInterface;

	//include AjaxResponse library
	use Drupal\Core\Ajax\AjaxResponse;

	//include core Ajax library
	use Drupal\Core\Ajax;

   //include OpenModalDialogCommand library
	use Drupal\Core\Ajax\OpenModalDialogCommand;

	class HelloModalForm extends FormBase
	{

			// buildForm function with multiple arguments.
			public function buildForm(array $form, FormStateInterface $form_state)
			{

				$form['#attached']['library'][] = 'core/drupal.dialog.ajax';
				$form['node_title'] = array(

												'#type' => 'textfield',
												'#title' => $this->t('Node\'s title'),
												'#description' => $this->t('Enter a portion of the title to search for'),
											  );

				$form['actions']['#type'] = 'actions';
				$form['actions']['submit'] = array(

													'#type' => 'submit',
													'#value' => $this->t('Search'),
													'#ajax' => array(
															   // here we add Ajax callback where we will process
															   'callback' => '::open_modal',
															   // the data that came from the form and that we
															   // will receive as a result in the modal window
															),
												 );
				$form['#title'] = 'Search for Node by Title';
				return $form;
			}

			public function getFormId()
			{

					return 'hello_modal_form';
		    }

			//validateForm() function for validation to fields.
			public function validateForm(array &$form, FormStateInterface $form_state) {

			}

			//submitForm used for submission of form
			public function submitForm(array &$form, FormStateInterface $form_state) {

			}

			public function open_modal(&$form, FormStateInterface $form_state)
			{

					$node_title = $form_state->getValue('node_title');
					$query = \Drupal::entityQuery('node')
					             ->condition('title', $node_title, 'CONTAINS');
					$entity = $query->execute();
					$key = array_keys($entity);
					$id = !empty($key[0]) ? $key[0] : NULL;
					$response = new AjaxResponse();
					$title = 'Node ID';

					if ($id !== NULL) {

						$content = '<div class="test-popup-content"> Node ID is: ' . $id . '</div>';
						$options = array(
							'dialogClass' => 'popup-dialog-class',
							'width' => '300',
							'height' => '300',
						);

						$response->addCommand(new OpenModalDialogCommand($title, $content, $options));

					} else {

					$content = 'Not found record with this title <strong>' . $node_title .'</strong>';
					$options = array(
										'dialogClass' => 'popup-dialog-class',
										'width' => '300',
										'height' => '300',
					             );

					    $response->addCommand(new OpenModalDialogCommand($title, $content, $options));
					}

				return $response;
		     }
	}

?>
update the routing file with following code :
	hello.modal :
	    path : 'hello/modal'
	    defaults :
	      _form: '\Drupal\hello\Form\HelloModalForm'
	    requirements :
	      _access : 'TRUE'
After updation of this file now update the “hello.links.menu.yml” file to create a new menu item for the modal window. Add the following to the end of the file :
	hello.modal :
	  title : Hello Modal Form
	  menu_name : main
	  route_name : hello.modal
	  expanded : TRUE
	  weight: 130
saving all go to dashboard :
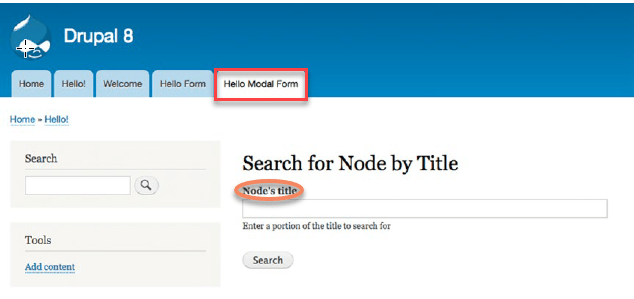
create a new node by visiting Content == > Add Content ==> Article.
Enter the full title in the node’s title text box of the new form and click the Search button.

How To Create Entities
In a development phase in which you need to creating a custom module that may be on a specific content type being present.
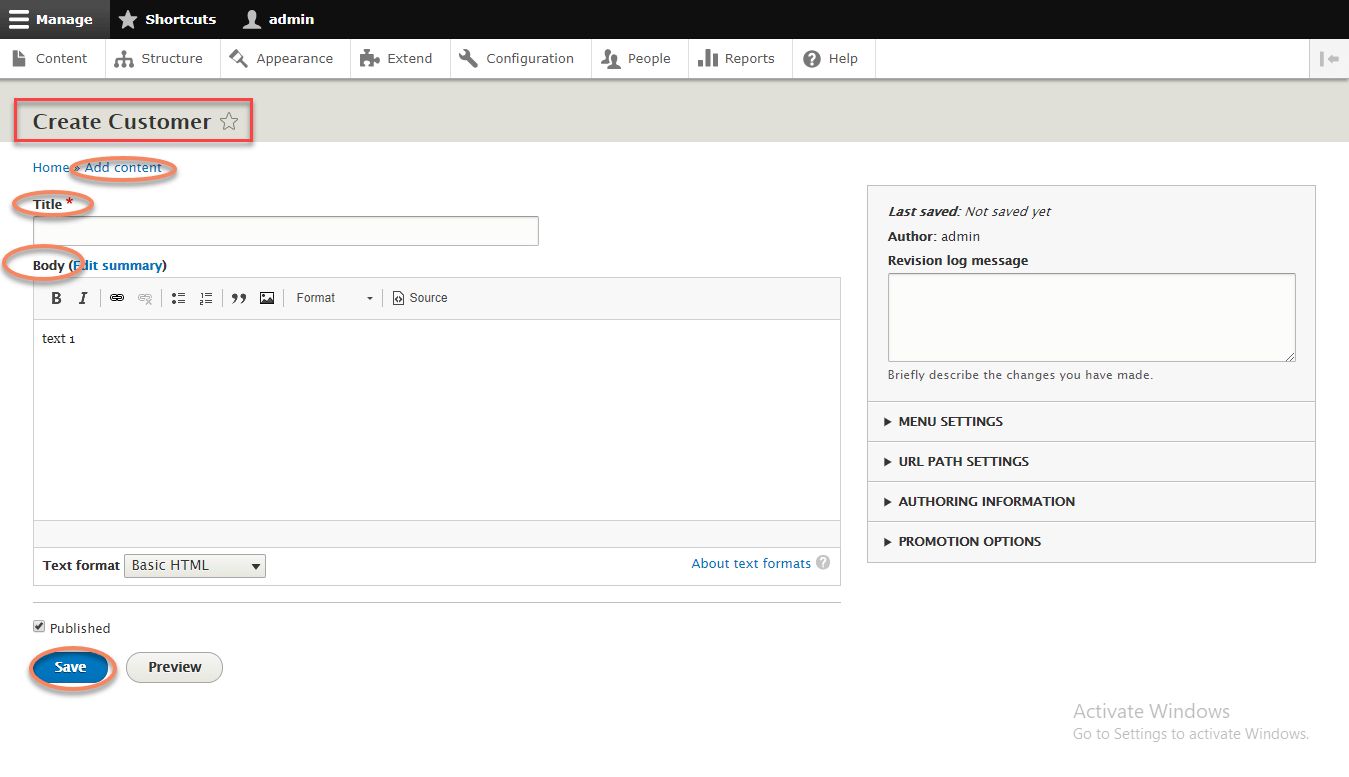
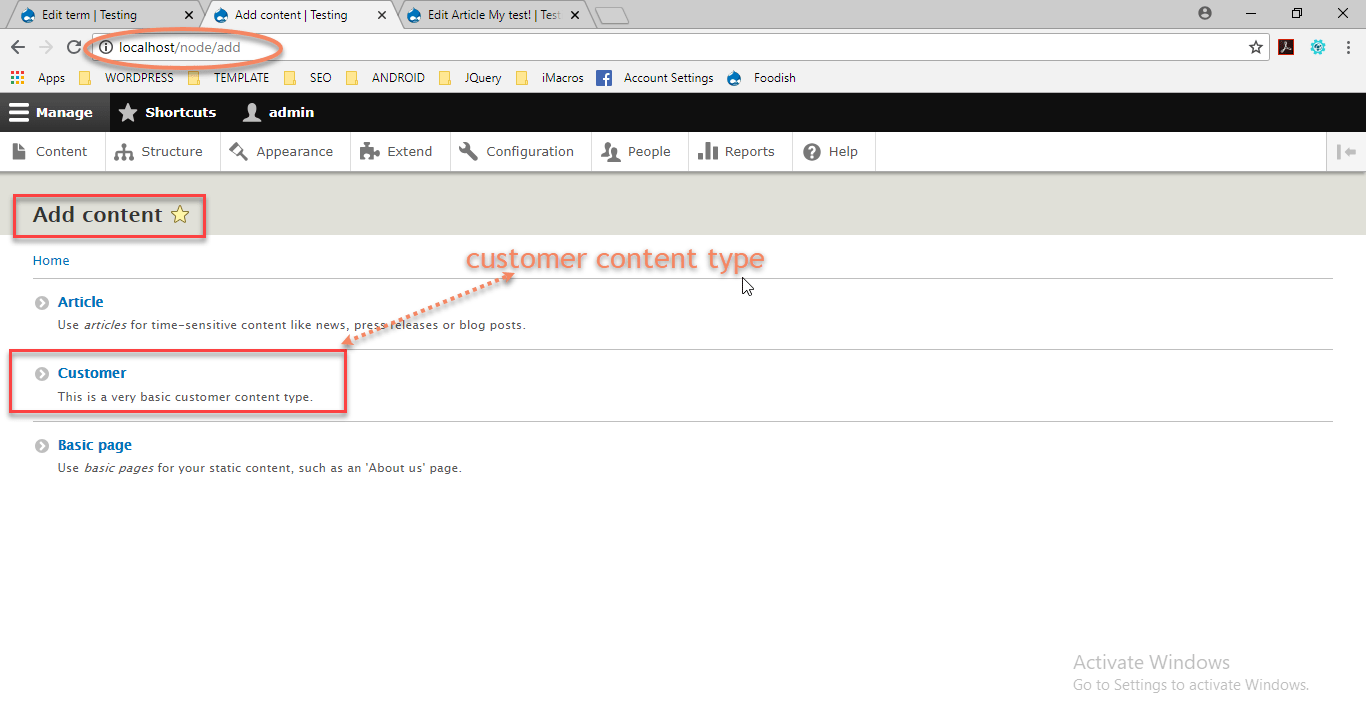
Here we will create a specific content type named as ” customer“.
Customer Content Type that will provide us a “title” with “body field”
to enter information about the ” customer “.
Starting creation of custom module customer, we will give the name the module as ” customer “.
In module directory create a new directory named as ” customer“.

create a new directory named as ” config ” in the “customer” directory.

Create a new directory named as “ install ” in the ” config” directory.

Structure as follows :
customer \ config \ install
The first file that we will create is “ customer.info.yml” file.
which exists in the / modules /custom / customer directory.
Add content to this file :
		name : Customer Content Type
		description : The simplest example of implementing a customer node content type in a module.
		package : Awesome modules
		type : module
		dependencies :
				- node
				- path
				- text
		core : 8.x
The next file that we will create is ” customer.module ” file under ” customer ” directory.
You may add additional functionality to the module.
In the ” install ” directory create three additional fileswhich are :
(a) node.type.customer.yml
(b) field.field.node.customer.body.yml
(c) core.entity_form_display.node.customer.default.yml

In “ node.type.customer.yml ” file add the following code :
	langcode: en
	status: true
	dependencies: { }
	name: 'Customer'
	type: customer
	description: 'This is a very basic customer content type.'
	help: ''
	new_revision: false
	preview_mode: 1
	display_submitted: true
	third_party_settings: { }
This is a standard “ yml ” file for all node-based content types.
The only value that is changeable is name, type, description .
The next file is ” field.field.node.customer.body.yml ” with following code.
langcode: en
			status: true
			dependencies:
				 config:
				   - field.storage.node.body
				   - node.type.customer
				 module:
				   - text
			id: node.customer.body
			field_name: body
			entity_type: node
			bundle: customer
			label: Body
			description: ''
			required: false
			translatable: true
			default_value: { }
			default_value_callback: ''
			settings:
			   display_summary: true
			third_party_settings: { }
			field_type: text_with_summary
This file is also a standard template file for creating fields.
The last file is ” core.entity_form_display.node.customer.default.yml ” file.
This file specifies that how the node edit form will show when content creators add a new customer to the site.
Add the following code to this file.
langcode: en
		status: true
		dependencies:
			config:
			  - field.field.node.customer.body
			  - node.type.customer
			module:
			  - path
			  - text
		id: node.customer.default
		targetEntityType: node
		bundle: customer
		mode: default
		content:
		  title:
			type: string_textfield
			weight: 0
			settings:
			  size: 60
			  placeholder: ''
			third_party_settings: { }
		uid:
		   type: entity_reference_autocomplete
		   weight: 1
		   settings:
			  match_operator: CONTAINS
			  size: 60
			  placeholder: ''
		   third_party_settings: { }
		created:
		   type: datetime_timestamp
		   weight: 2
		   settings: { }
		   third_party_settings: { }
		promote:
		   type: boolean_checkbox
		   weight: 3
		   settings:
			 display_label: true
		   third_party_settings: { }
		sticky:
		   type: boolean_checkbox
		   weight: 4
		   settings:
			 display_label: true
		   third_party_settings: { }
		path:
		  type: path
		  weight: 5
		  settings: { }
		  third_party_settings: { }
		body:
		  type: text_textarea_with_summary
		  weight: 6
		  settings:
			rows: 9
			summary_rows: 3
			placeholder: ''
		  third_party_settings: { }
		hidden: { }
		third_party_settings: { }
After saving all the files,
Goto the dashboard and search the “ customer ” module in the “Awesome Modules section“.

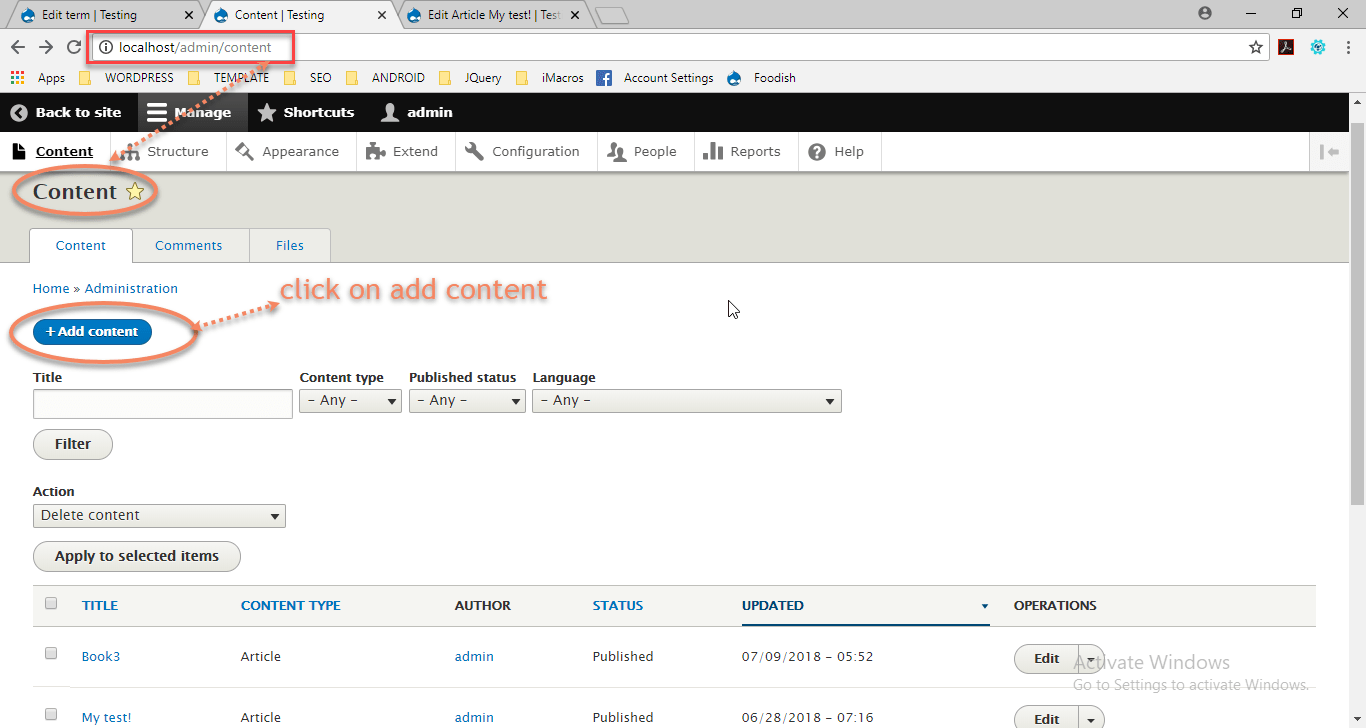
After enabling this “customer” content type. select content page and click the “add content” button.
Creating, Updating, and Deleting Entities
This section we will describes how to create nodes, files. nodes apply images , taxonomy terms, and menu item.
Creating Entities :
Before implementing this functionality on your site to be sure of several things:
First enable all the multilingual modules and setup spanish language that your site supports.
Goto :
Structure => Taxonomy => Manage => Tags
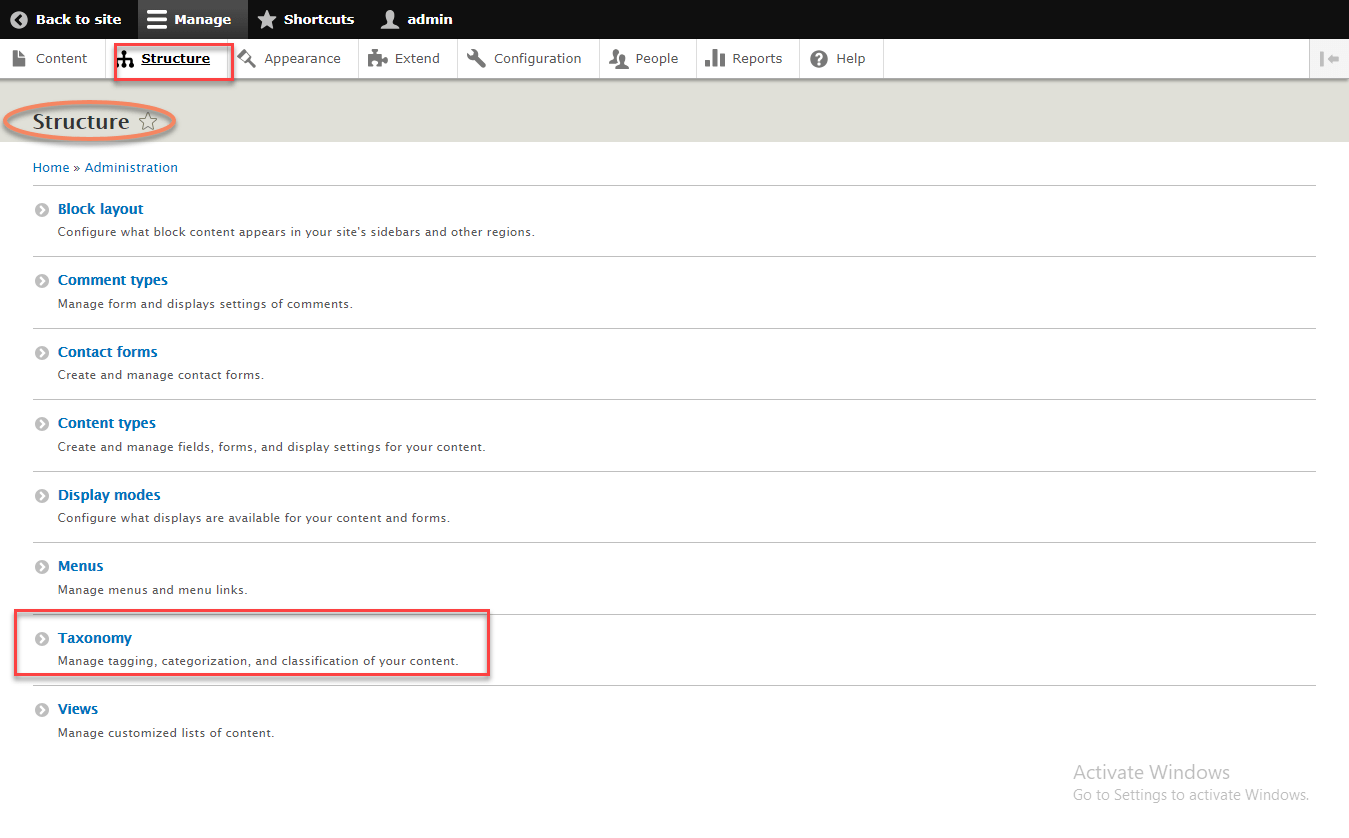
creates a new taxonomy term in the tags vocabulary.
It will be used in the node that will be created following process.
Creating Nodes :
First we will add some content to our ( .module ) file.
we will add very top a code in this file, we add use Drupal \node \Entity \Node.
use Drupal \ user\ Entity\ User
In our next step we will create a new function in the module file.
Function code is as follows :
<?php

	function hello_create_node()
	{

			$node = Node::create([

						// The node entity bundle.
						'type' => 'article',
						'langcode' => 'en',
						'created' => REQUEST_TIME,
						'changed' => REQUEST_TIME,
						// The user ID.
						'uid' => 1,
						'title' => 'My test!',
						// An array with taxonomy terms.
						'field_tags' =>[1],

						'body' => [
							'summary' => '',
							'value' => '<p>The body of my node creating custom node programatically.</p>',
							'format' => 'full_html',
						],
			]);

			$node->save();
			\Drupal::service('path.alias_storage')->save("/node/" . $node->id(),"/hello/example-node", "en");

			$node_es = $node->addTranslation('es');
			$node_es->title = 'Mi prueba!';
			$node_es->body->value = '<p>El cuerpo de mi nodo.</p>';
			$node_es->body->format = 'full_html';
			$node_es->save();
			\Drupal::service('path.alias_storage')->save("/node/" . $node->id(), "/mi/ruta", "es");

		return t("Created node " . $node->get('title')->value);
     }

?>
This codes creates a new ” $node ” object by using the “ Node :: create ” method.
Creates a new language translation of the node into the spanish and also creates a new alias in spanish.
With the functionality which is already present in the module file.
Our next step is to update the controller for the hello module.
We need to edit the ” HelloController.php” file in the ” src/controller ” directory.
Add the following code to this file.
<?php

	public function create_node() {

	   return array(
				 '#markup' => hello_create_node(),
		     );
	}

?>
Add code at the end of the routing file, which is “ hello.routing.yml ” file.
	hello.create :
	  path : 'hello/create-node'
	  defaults :
		 _controller: '\Drupal\hello\Controller\HelloController :: create_node'
	  requirements :
		 _access : 'TRUE'
The route file provides the URL of the hello /create-node.
After visiting of the URL go to :
Admin => content
Here you can see both english and spanish version of the node.

Clicking on the ” My Test ” title which displays the node as it was created by the module.
